Tuesday, March 31, 2009

Gimme a Brake Pt. 2


The passenger side rear brake assembly with a new brake drum installed.


I began working on the driver side rear brake assembly yesterday, but unfortunately I could not complete the job because one of the components that I needed to reuse was rusted so bad that it snapped in half; the brake kit that I bought did not come with the replacement, so I was out of luck. Hopefully I can find the piece at an auto parts store, perhaps at NAPA today when I bring my intake manifold in to get hot dipped.


The Jeep Wrangler wiring harness that I bought on Sunday.


My t-case (left) next to the broken one that I got for free.

I will be swapping input shafts because mine is made for the 2.5L engine, not the 4.0L.


Monday, March 30, 2009

Time to Spend More Money

Last week Dave was searching craigslist and he stumbled upon a great deal on an AX-15 transmission (the type that is used with the Jeep 4.0 L engine), and after he spoke with the seller on the phone, we decided to make the trip up to buy it. So yesterday we drove about an hour and 20 minutes up to East Sparta, Ohio to the guy's house.

His house was out in the middle of the woods and surrounded by swamps and streams, and there were lots of trails and great mud patches everywhere. It was pretty clear from his assortment of vehicles that he was taking advantage of all the trails nearby. He had two Jeep Wranglers (a YJ and a TJ) that were both lifted with big off-road style tires and both were covered with mud (I'm talking mud caked on everywhere, even on the seats inside the Jeeps). He also had some little ATV's and off road vehicles that were pretty cool. I don't know why I didn't think to take any pictures while I was there, I'm kicking myself for it now.

He also had 4 full-sized ROTTWEILERS. I've never seen a Rottweiler up close, and I couldn't believe how huge and solid they are. Fortunately they were really friendly and all wanted to lick me and sniff me and not eat me.

So, I ended up buying an AX-15 tranny from him for $250, and he was such a nice guy that he threw in the bell housing and a broken transfer case (which has the 23 spline input gear I need) for free. Then he also showed me a full wiring harness and 
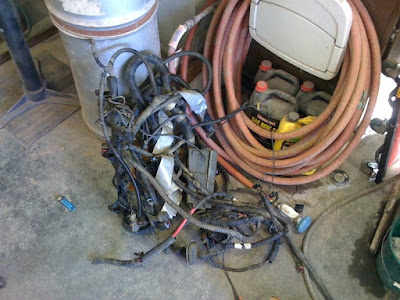
ECM that he pulled from a 4.0L Jeep Wrangler. Getting this stuff would save me the huge headache of figuring out how to get my 4 cylinder wiring harness to work with the new 6 cylinder engine, and also determining whether or not the Grand Cherokee ECM that I got from the guy who sold me the engine would work or not. I bought his harness and ECM for another $200.

Dave, being the impulsive buyer that he is, saw a set of half doors and a full set of seats that the guy had lying around, and bought them on the spot with cash that he brought with him "just in case" the guy had something he wanted.

I didn't do any work on the Jeep because it was cold and rainy and I didn't feel like working. Here is the list of things I will be working on in this week:

- Clean the new transmission (exterior and interior)
- Swap in the new input shaft into my t-case
- Finish cleaning up the 4.0
- Get the intake manifold hot dipped
- Install the rear brake assembly on the other side
- Reassemble the engine/tranny/t-case and prep for re-installation

Saturday, March 28, 2009

Gimme a Brake...

So today I put in close to 9 hours of work and I got a pretty good amount of stuff done. I spent the first couple of hours changing the oil in my RX-8 (gsmithrx8.blogspot.com), which happened to be the first time I've ever changed my own oil! Maybe I'll actually add another entry to that blog for the first time since November...

My first big project today was removing/masking all of the components on the 4.0 so that I could clean it up and give it a few coats of engine enamel. It might not be evident from the pictures, but the engine enamel really helped out the appearance of the motor. The valve cover turned out especially nice, which is great because that will be the most visible part of the engine when the hood is popped.


The next thing I did was to strip down the intake manifold so that I can take it into NAPA and get it hot dipped. The toughest part was getting the fuel rail off, which turned out to be just a pull and wiggle technique according to my newly purchased Haynes manual.


The final, and by far WORST thing I worked on today was setting up and installing a new parking brake on the rear right axle hub. I thought it was hard getting the brake drum off last night; well that was nothing compared to installing new brakes. Not only did I have to figure out 90% of the assembly on my own, but I also had to deal with compressing springs and getting everything to fit just right without any assistance. I have a new respect for auto mechanics now...


I still have to do the same thing for the driver's side rear brake, but it shouldn't be as tough now that I have struggled through it once and I know how to do everything.

Friday, March 27, 2009

Spring Cleaning

Yesterday was Thursday the 26th, and I started the evening by pushing the Jeep out of Dave's garage so I could sweep up all the dried mud that has been collecting on the floor. I also cleaned up the various fluids that have leaked out of my old engine/transmission/transfer case. Since Dave has multiple kids and dogs, poisonous fluids aren't the best thing to have sitting in puddles on the ground.


A three legged dog that lives in Dave's neighborhood, he's usually really wet and smells awful...


On the subject of cleaning, I also threw my old seats and my spare tire in the back of Dave's truck and took them down to his barn to store them. I'm kind of a neat freak, so the more space I have and the better things are organized, the happier I am.


One thing I did yesterday that actually involved my Jeep was to remove the transfer case from my old AX-5 transmission. The transfer case is pictured below, and it is used to convert some of the power from the engine into rotational energy to drive the front wheels when the 4 wheel drive is engaged.


When 4WD is not engaged, the T-Case simply causes the rear output shaft (the one on the top left) to spin by itself. Upon engagement of the 4WD, certain gears inside the T-Case mesh, causing the front output shaft (the one on the top right) to rotate, thus rotating the driveshaft attached to the front axel. The T-Case was a PITA to remove because there were about 8 nuts to remove and there was barely any room to fit a wrench in between the tranny and the t-case housing.

The next thing I did was drain all the oil out of the oil pan and then remove the pan from the engine. I wanted to replace the gasket, and while the pan was off I was able to clean it inside and out to remove build-up and sludge.


I spreayed the exterior of the pan with engine degreaser and then wiped it down after letting the degreaser soak in for 10 minutes. It took some elbow grease to get the sludge off, but in the end it was worth it to get the oil pan looking like (almost) new.

Although the interior components of the engine appear to be sludge free and in great condition, the exterior could use some work. I'm thinking of picking up some engine enamel that I could use to spray the entire engine block to clean up the appearance. I hope to get a good deal of work in tomorrow (Saturday); it's supposed to be 65 and sunny, so it should be a perfect day to be out working on the Jeep, although I'd rather be driving it!

Taking out the Interior

On Tuesday, March 24th, I spent most of the evening pulling out as much of the interior as I could. I managed to get all three seats out with little difficulty. The carpet was a little harder because of some accessories bolted down on top of it, such as the center console and the seatbelts.


As you can see, there is quite a bit of rust on the floor which will need to be sanded and then repainted. I still need to remove the carpet covering the rear wheel wells as well as the speakers and the wires running up to the dash.


My original plan was to simply throw out (or sell) the current seats because they are old, dirty, and ripped. Lately I've been considering keeping them and simply buying seat covers in order to save money, but I'm still undecided on this issue.


I turned the engine on the motor mount so that I could attempt to clean out the intake ports as much as possible without accidentally scraping any of the build-up into the cylinders. I don't know if I was successful or not... The grime buildup was pretty heavy and I wasn't able to get it all off.


My header is quite rusted and is also slightly cracked at the point where the tubes merge. But, since a new header will cost me around $400+, I think I will end up sand blasting it, welding the crack shut, and painting it to make it look good. The intake manifold will likely be taken to NAPA autoparts to be hot dipped (which I hope will clean it up nicely).


Next step: keep cleaning the engine!

Tuesday, March 24, 2009

Out With the Old, In With the New


Ok, so the new hasn't actually gone in yet, but the old has come out and to me that is a major milestone. Before this project, the biggest undertaking I had ever completed on a vehicle was changing the spark plugs, and I thought that was difficult. And now I have taken an entire engine and transmission out of a vehicle after 4 days of work.


Nothing but a gaping hole where the engine/tranny/t-case used to be.


The old engine has come out, and the new engine is waiting to go in.

Transplant Needed - Donor Found

After much discussion and thought, I finally decided to go with an AMC 4.0L Inline 6 cylinder engine to replace my stock 2.5L Inline 4. The 4.0 has fuel injection, unlike the 4.2L carb'd Inline 6 that came before the 4.0. The 4.0 would also give me extra torque and power over the 2.5L so that I wouldn't have to worry about being sluggish on the highway.

Dave and I both searched on sites like Craigslist and eBay in hopes of finding a 4.0 that was reasonably priced and not too far away. Dave lucked out in finding a 4.0 listed in the classified section of the newspaper that was pulled out of a 1996 Jeep Grand Cherokee Laredo with only 75,000 miles on it for $250. The engine also came with the wiring harness and the ecm (electronic control module, aka the computer that controls the car) out of the Grand Cherokee, which was a great find.


On Saturday, March 21, Dave and I went to buy the engine. It was in very good condition and the seller gave us some good information about the engine and some advice on putting it in a Wrangler.


The next thing we did was stop at an AutoZone to buy some engine degreaser. We sprayed down the entire engine while it was still on the trailer. Then we took it to a car wash and used a heated power washer to spray down the engine.


This method worked surprisingly well and most of the grease was removed, leaving the engine looking very nice. The only areas that I was unable to clean were on the oil pan, which was obstructed from the path of the water by the spare tire we used to rest the engine on while we transported it.


We hooked the motor up to a motor mount for easy access and transportation. After removing the valve cover to take a look at the push rods and rockers, we noticed that they were extremely clean for an engine with 75,000 miles on it, and we decided that I wouldn't need to do any major rebuilding, which would save a considerable amount of time and money.


All in all, Saturday was a really good day thanks to finally tracking down a replacement engine, getting a great deal on it, and being comfortable that it had been taken good care of by its previous owner(s). I can't wait to get it installed and see how the extra power feels.

Surgery Begins

After test driving the Jeep, it was time to begin the tear down. The first thing to remove was the hood, which was only secured by a few bolts.


Step 1 was to remove the hood.

The doors were a little harder to remove, they had become fairly rusted at the hinges and needed to be pounded out with a hammer.


The doors lift upwards out of the hinges,

Next I removed the grill and the radiator as one unit.


The fenders were harder to remove because there were many bolts securing them to the main tub, most which were hard to access without first removing the various engine bay components surrounding the engine.


Nothing like a nice cold beer to help stay hydrated.

In order to gain access to the transmission and transfer case, I needed to remove a large plate from under the Jeep. The bolts securing this plate to the frame were large and extremely rusted, so Dave used a hot wrench (basically just a blow torch) to heat up the bolts, which allowed me to use a breaker bar to break them loose. Then I used an impact wrench (like an air powered drill) to unscrew the bolts the rest of the way.

When I was able to reach the transmission, I unbolted it from the frame which allowed me to disconnect the front and rear drive shafts. Unfortunately, Dave didn't warn me that the transfer case would be full of gear fluid, and when I pulled the driveshaft out of the t-case I watched as fluid poored all over my chest... good times.

The engine is much more accessible without the grill or fenders in the way.

The pile of removed parts is constantly growing.

Love at First Drive

Although I am oficially starting to work on this blog today, this project technically started back on March 9th. So bear with me as I post old stories and pictures while I attempt to get up to date.

The day which I consider to be the first day of this project was Monday, March 9th. On that day, I stopped by Dave's house to get a tour of his "facilities". I saw his two car garage next to his house, where he is currently keeping his own Jeep project (I should probably get a picture of that, 'cause it's gorgeous). I also saw the enormous garage (it's more like a barn) he has down the hill from his house where my Jeep was being kept along with a couple Trans-Ams (his future projects) and a wide variety of auto parts including engines, transmissions, body components, and the like.

Later that day, after I had returned to my apartment, Dave called me to inform me of a great deal that he had discovered online that he suggested I strongly consider for my Jeep. It was a set of full doors and a hard top. These items would be pivotal come winter when a soft top and half doors would function as very poor thermal insulators, not to mention being extremely noisy on the highway.


The thing about these items that made them a deal was that the guy selling them was only asking $600 for the set. According to Dave, a good set of full doors can cost up to $800 by themselves, and a hard top can cost $300 or more. So I called the guy up (it ended up being a kid), and told him I was interested and was wondering if he would take $500. He said he could do that. Then I told him that I read on his posting that the latch on the hard top was broken, and that this can be expensive to replace, so could he come down to $450. He hesitated, but agreed. So the following day I brought him $400, told him that I couldn't get more than that from the ATM, and I ended up getting full doors and a hard top and a great price.

On Monday, March 16th, I finally got to test drive the Jeep! It was amazing, truly love at first drive. I'm used to being about 3 feet off the ground while zooming around in my RX-8, and while that is fun and the handling is great, being 6 feet off the ground in the Wrangler and driving around with no roof or windows exposed to the wind is a blast. The 2.5L engine struggled a bit on the interstate, especially when going up hills, but it had no problem at all going off road and climbing up the side of the hill by Dave's house in low gear. I even took it through some mud after getting some peer pressure from my buddy Kevin, which is something I have been regretting this past week while I work under a Jeep that is covered in dried mud.

The frame is in great shape, as are the brakes and the suspension. There is some minor rust on the exterior and some in the floor panels, but this problem will be solved using the replacement body panels I purchased from JC Whitney. I will definitely need to replace the seats and the interior carpet; I'm hoping to get the interior looking very clean and new.

In the next post I'll start documenting the tear down and engine removal, and there will be lots of great pictures.

Project JEEP Begins!

Hello and welcome to my blog. This is where I will attempt to keep track of everything that goes on during my first ever vehicle restoration project. The vehicle of choice is a white 1992 Jeep (YJ) Wrangler with a 2.5 L in-line 4 cylinder engine and a 5 speed manual transmission. I purchased this Jeep from my friend Dave who is also a vehicle enthusiast and who happens to have a great deal of Jeep knowledge (and more importantly great facilities and just about every tool you'd ever need).

I've always wanted to take a vehicle in poor condition and do a complete restoration all by myself; from the body work, to the suspension, to the drivetrain. When I met Dave and heard that he does this stuff all the time as a hobby, I knew I couldn't let the opportunity to take advantage of his facilities pass me by (just kidding, Dave).

Jeep Wranglers were always vehicles that I considered to be a lot of fun and really cool. As it turns out, they are also relatively easy to work on, making them a prime choice for a beginner like myself. Another benefit to restoring a Jeep is the 4WD, which will come in handy for me in the winter when it snows and my RWD Mazda RX-8 becomes almost entirely useless. Fortunately, Dave happened to have a Jeep sitting around just waiting to be given a new life, so my timing was perfect.

Hopefully I will be vigilant in updating this blog (unlike my RX-8 blog, http://gsmithrx8.blogspot.com/). I've already completed a fair amount of work on the Jeep, and I have many pictures which I will be posting shortly. Right now my goal is to have the Jeep ready by July 1st so that I can drive it home to Massachusetts when I take a week off of work. My family usually gets together for the 4th of July, and I would love to show off my completed project to everyone and take people for rides!

Stay tuned for updates and pictures, and thanks for stopping by.